
Quick start
Introduction
IfYou have just received the Antigone module, and I thank you havefor reachedthat. thisLet's point,get itstraight meansto the point and ensure we play our first instrument.
This documentation refers to firmware version 1.0.6 (if you do not have probably acquired the "Antigone"correct module!firmware, AsI encourage you surelyto know,update ityour module).
https://doc.nanopol.is/books/fr-antigone-documentation/page/comment-mettre-a-jour-le-firmware
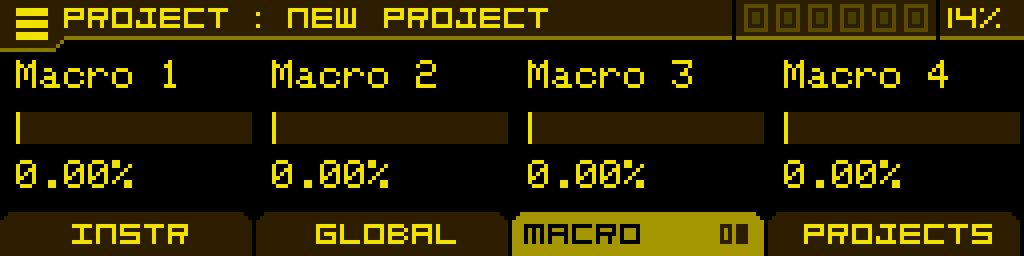
The Init project
On first power-up, your module will start with the Init project.

The concept of a project is aquite multi-timbralsimilar moduleto withthe 6projects offered by Elektron machines (such as the Digitakt, etc.). A project can encompass one or more instruments and define the playing characteristics for each of them: the number of voices used, the playing mode (Monophonic, Legato, Stereo), the type of polyphony.control It(MIDI, canCV/Gate), beand used as a simple oscillator, or as a complete synth voice.more.
YouBy candefault, allocatethe theseInit 6project voicesonly asuses you see fit, for example with 3 simultaneous instruments:- a firstone instrument with(INST 31), voices of polyphony- a second instrument in unison with 2 voices- and a last monophonic instrument.And this is just an example; you can also allocate all 6 voicesassigned to a single instrumentvoice of the module (which has 6 voices in total). The sound produced by this voice is routed to outputs 1 and 2 of the module.
All of this can be modified later, but for now, let's stick with this simple configuration.
By default, the control type is set to "CV/Gate," but if you also have the "MIDI/CV Expander," the default control type will be configured as MIDI.
Connect an audio cable
Now connect a cable to the "Out 1" output of your module and connect the other end to your mixer, amplifier, or haveaudio 6interface. monophonic instruments atDo the same time.with a second cable on the "Out 2" output.
Each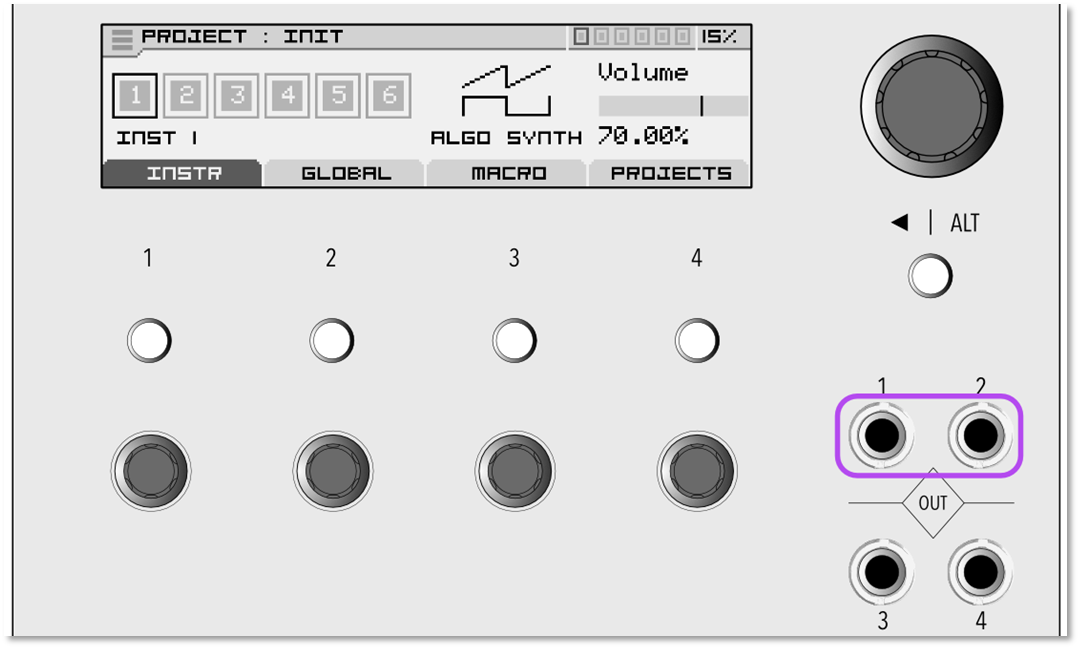
Tip: You can play a note right away by pressing and holding the ALT button, and while holding ALT, pressing the encoder will play the C2 note of theseyour voicesproject.
Connect a keyboard
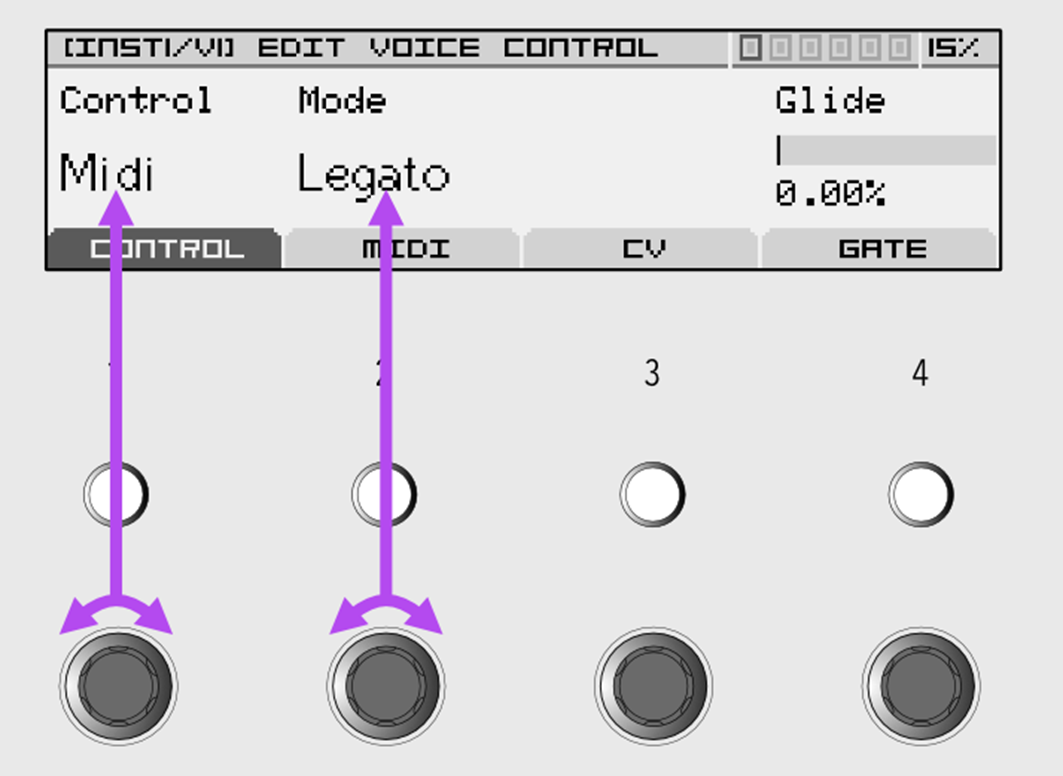
In the global settings of your project, you define the control type you want for this project: You can choose between CV/Gate or MIDI*.
*Note: MIDI will only be controlled by CV and Gate inputs, oravailable if you have the extension, via MIDI on different configurable channels.expander.
Set the control type.
Functionality
From Diagram
the 
home
Eachscreen, voice can be controlled by CV/Gate or MIDI.
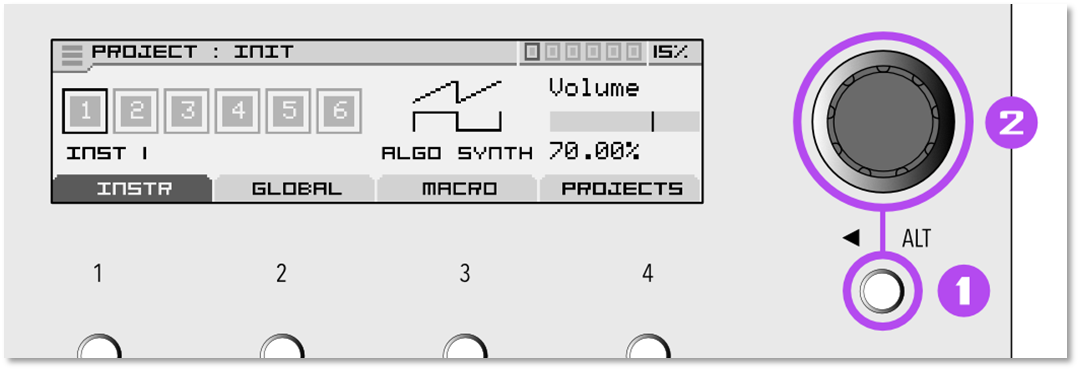
An instrument can have onenavigate to sixthe voices"Global" tab of polyphonyyour withinproject.

To do this, click the limitbutton oflocated 6just voices available for all instruments. Each instrument can operate in mono, legato, unison, unison legato, or poly. You can configurebelow the operatingtab modeyou ofwant eachto instrumentopen. asIn wellthis ascase, thepress numberbutton of2.
Once in the "VoiceGLOBAL control" module.
Each instrument includes a sound-generating machine (Wavetable Synthesizer, Multiple Model Synthesizer (algo), Sample player, ...)
Audio outputs can function in pairs (stereo) or independently; routing is done in the "Mixer" module.
Saving an instrument preset only contains the instrument parameters, i.e., the machine + its 4 modulation slots.
Saving a project preset contains all the module parameters; if you reload this project later, you restore 100% of the parameters.
The "Voice control" module also allows saving and loading presets; a "voice control" preset contains only the voice allocation configuration for each instrument and all associated configuration parameters (how the instrument is controlled, MIDI channel, CV/Gate inputs, mono, poly, legato mode, etc...)
Main Screen
When you turn on the Antigone module, you will see the "Project" screen. This screen is divided into several areas.
Header
At the top left of the screen, you have the "burger" menu thattab, you can select and open using the encoder.
The nametype of theGLOBAL current project (Init in the screenshot)
Voice allocation configuration, the edited instrument is highlighted (Instrument 1 is currently edited in the screenshot).
Processor consumption (21% in the screenshot), be careful when the processor reaches more than 95%, it is indicated as OVR (Over)
Body
Voice allocation configuration, the edited instrument is highlighted (Instrument 1 is currently edited in the screenshot).
The icon of the machine loaded on the currently edited instrument
The general volume of the instrument
Tabs
The 4 tabs (Instrument, Global, Macro, Projects) of the Project screen. You can switch tabs using buttons 1-4. If a tab has multiple pages, it is indicated on the tab whensettings you are on it (see the next screenshot); you can go to the next page by pressing the tab button again.
How to Get Sound?
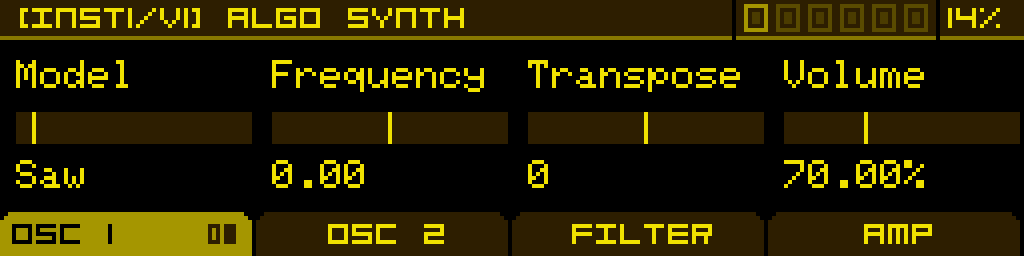
Load the "Init" project (it is initially loaded when the module starts), you can still reload it later by clicking on the "burger" menu, then "Load project", then "Init.nagp".In this project, instrument 1 is loaded (monophonic), using the "Algo synth" machine, with a simple SAW passing through filter 1 and an amplifier (DCA), an envelope is connected to filter 1, and a second envelope to the amp (DCA).
All project presets are by default usable on MIDI channel 1 and use sound outputs 1-2 (stereo). If you connect a MIDI keyboard or sequencer and send notes on channel 1, you should get sound output on stereo outputs 1-2.
If you ever want to changeedit by turning the wayencoder. Then, navigate to control"Voice instrument 1 to CV/Gate instead of MIDI.
Ctrl."
GoOnce
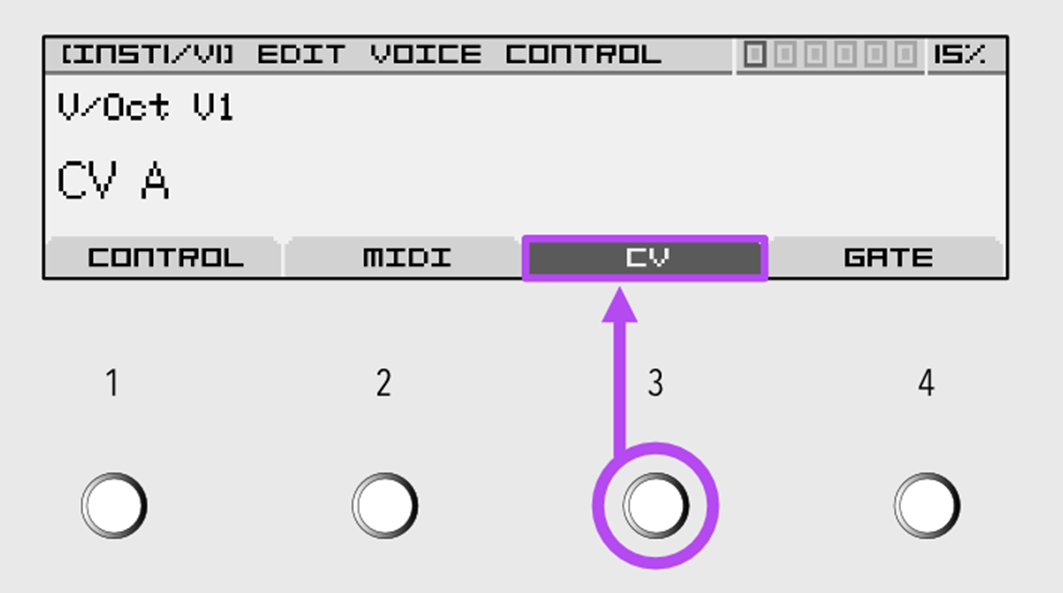
toon "Voice CTRL," press the"GLOBAL"encoder.tabOpen the "VOICE CONTROL" module using the encoderSelect instrument 1 using the encoder, make sure you are on the "CONFIG" tabClick the encoder to enter the configuration of instrument 1Using potentiometer 1 (which is under the "Control" parameter), choose "CV/Gate".In the CV and Gate tabs, you can choose which CV input and which Gate input will control this instrument.

How to Modify the Sound?
Click several times on the< | ALTbutton to return to the initial project page.Select instrument 1, and enter it by clicking on the encoder- You
should be on the following screen: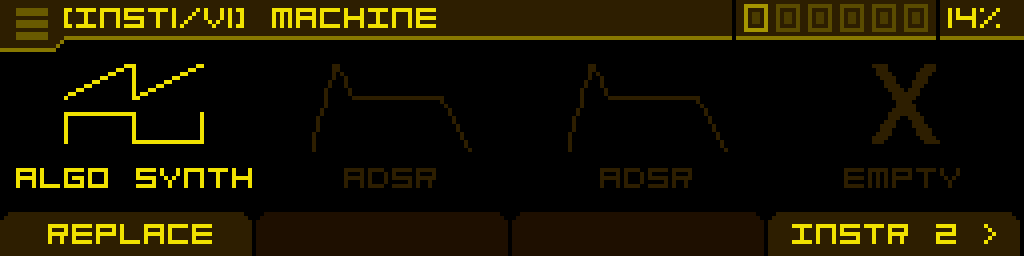
The first slot represents the sound-generating machine, here "ALGO SYNTH", there are 2 modulation slots following in which ADSRs are loaded. This screen allows you to load modulations into the slots or replace the "machine" with another. Enter the "Algo synth" machine; youwill arrive atthethismainscreen.page:
IwillnotgoMISSINGintoSCREENdetailCAPTUREaboutFrom this
machinescreen,atbythisturningstage;the encoder, you cantryselectplayinganwithinstrument to edit. Navigate to theparametersfirsttoinstrumentsee(INSTRhow1).theyaffectOnce you're in INSTR 1, you can now define its control type.
Select the
controlsound.type Nowyouwewantwillbyassociateturningathenewfirstmodulationpotentiometer(ADSRlocated1)verticallywithbelow the "Sync"Control"parameter;parameter.goCV/Gate
In CV/Gate control mode, you can use a compatible keyboard or controller.

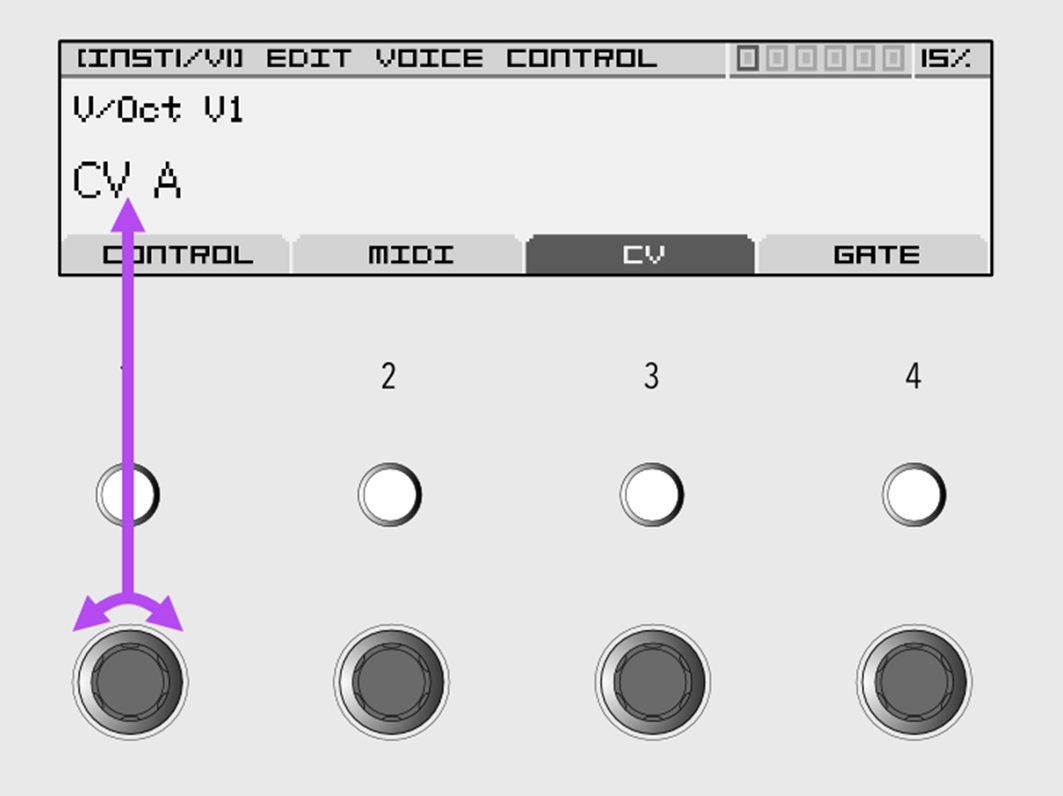
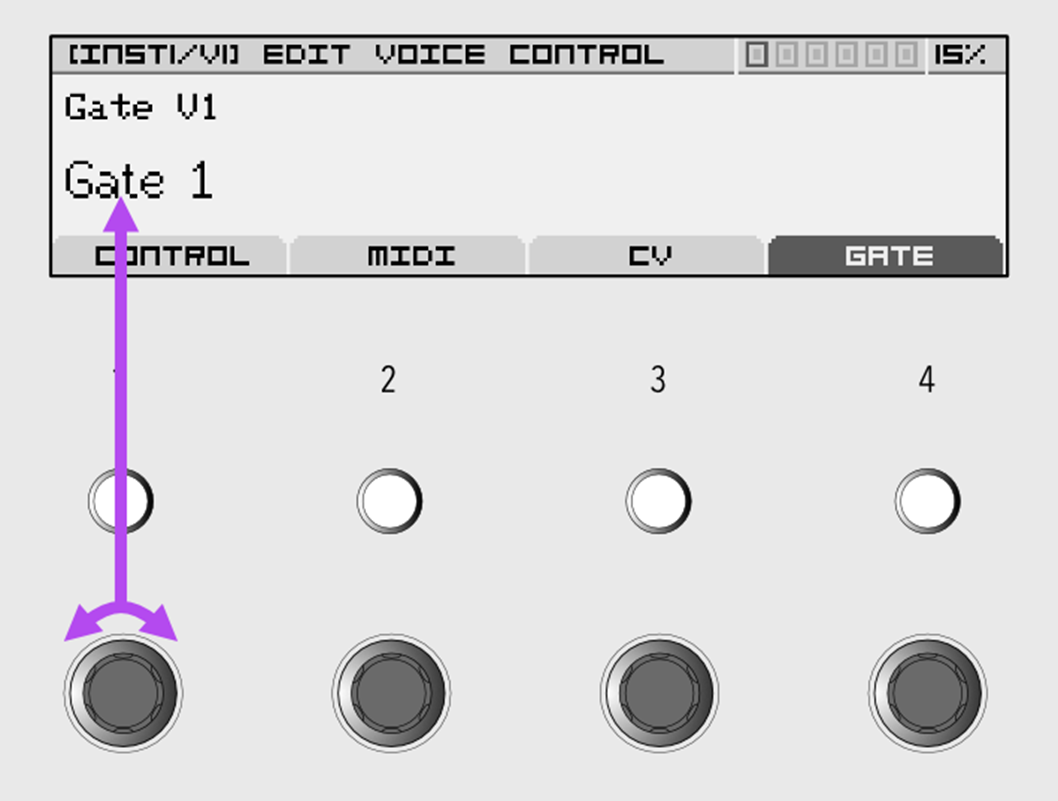
Connect a cable to
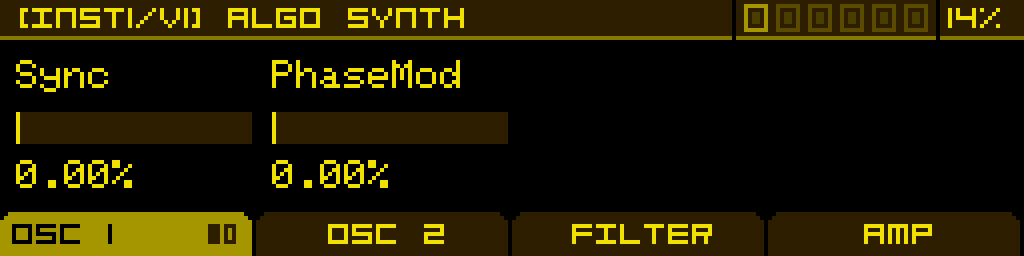
pagethe2"Gate 1" input ofOSCthe module, and the other end to the "Gate" output of your keyboard.Connect another cable to the "CV IN A" input of the module, and the other end to the "CV" (or Control Voltage, or Pitch, etc.) output of your keyboard.

You should now be able to play and hear the sound being sent to outputs 1
(usingandbutton 1):2.
Holdcandown button 1 (which is undermodify theSyncCVparameter)inputforusedabylongyourtime;keyboard by selecting the CV tab on the same screen.

You
Then, turn the potentiometer located vertically below the parameter you want to modify.
You can modify the Gate input used by your keyboard by selecting the GATE tab on the same screen.

Then, turn the potentiometer located vertically below the parameter you wish to modify.
Midi
If you choose the MIDI protocol, you will enterneed to have the modulationMIDICVExpander.
|
You can
|
MIDICV Expander |


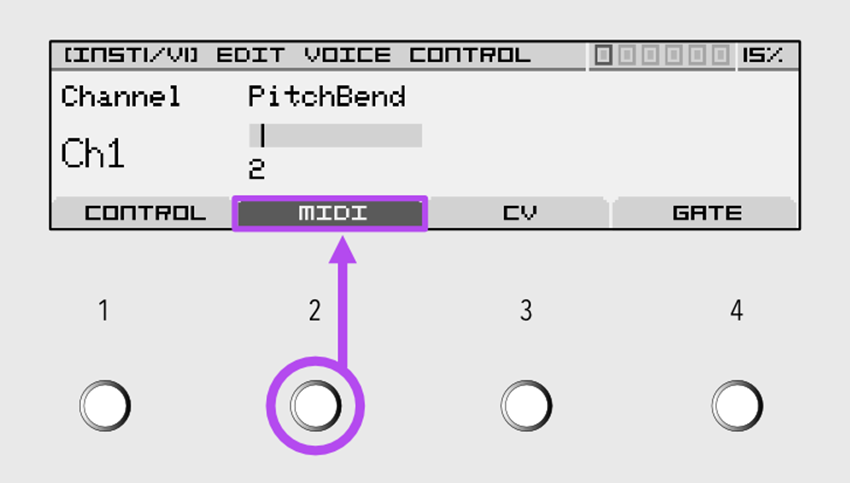 From the MIDI tab, accessible by pressing button 2 on this screen, you will have
From the MIDI tab, accessible by pressing button 2 on this screen, you will have the Syncoption parameter!to
