Synthesis Machines
There are 4 different Machines available in Antigone: Algorithmic Synth, Wavetable Synth, Sample Player and Crossmod.
Algorithmic Synth
General information
This Machine features 2 identical oscillators with 16 different algorithms to choose from. Each oscillator can be tuned, transposed and have its own algorithm (model).

The oscillators go into a Filter section, then a Drive section and finally an Amp section before going to the Mixer.
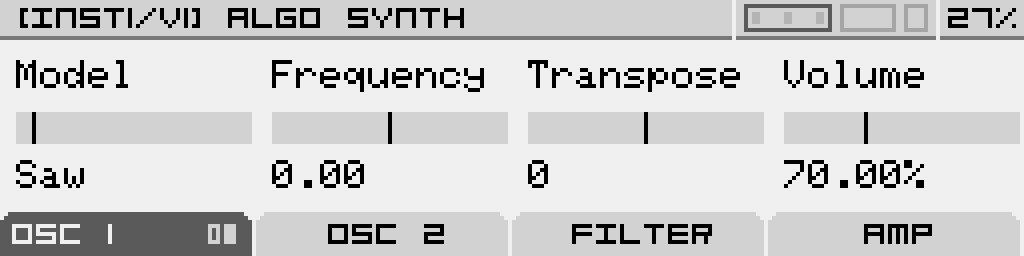
Main screen of the algorithmic synth

When opening the Algorithmic Synth Machine you will land on page 1 of tab 1. Use the first 2 tabs to configure oscillator 1 and 2 respectively. Use Tab 3 to configure the Filter section and Tab 4 to configure the Amp section.
The oscillator tabs (Tab 1 and Tab 2) will have a number of pages containing different controls depending on the selected model. When a Tab header displays small bar icons, click its corresponding button underneath to jump between its pages.
When you adjust a parameter on one the pages, a wave display is briefly shown to reflect the changes on the output wave. Click Button 4 while the wave display is shown to lock it on. Click Button 4 again to unlock the display.
The first page of an oscillator tab is always the same:
| Model |
Frequency |
Transpose |
Volume |
| Select the synthesis type used in the oscillator |
Fine-tune the oscillator. This can be used to achieve beating-effects by having th two oscillators slightly out of tune with each other |
Tune the oscillator by one semitone increments. This can be used to have the Machine play a paraphonic interval, or use one oscillator as a sub |
Adjust the volume at which the oscillator is sent down the signal path (to the Filter section, or directly the the Amp section if all filters are turned off). 100% is unity gain, but it can go up to 200% if you can to overdrive the Filters, Amps or even the final DAC. |
Saw model
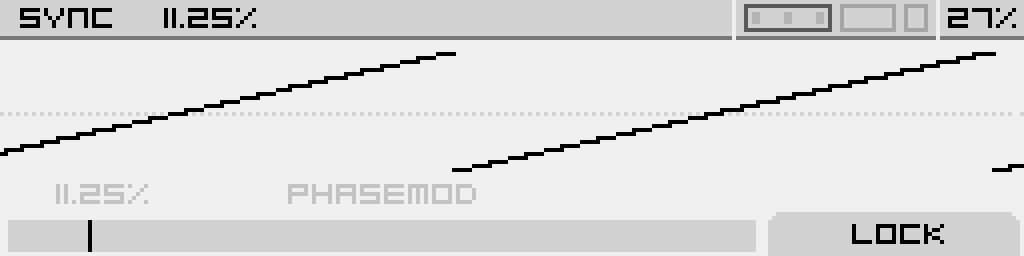
A saw wave with Virtual sync capabilities.
The oscillator tabs have 2 pages. Page 1 is the same as mentioned earlier.
Page 2:
| Sync |
PhaseMod |
||
| Above 0%, the saw wave is synced to a master oscillator. This adjusts the frequency of the slave oscillator you're hearing. Modulate for classic sync sounds | Above 0%, the saw wave's phase is modulated by another oscillator tuned at 0.75 times the frequency of the Saw. Increasing the parameter augments the modulation depth |
SuperSaw model
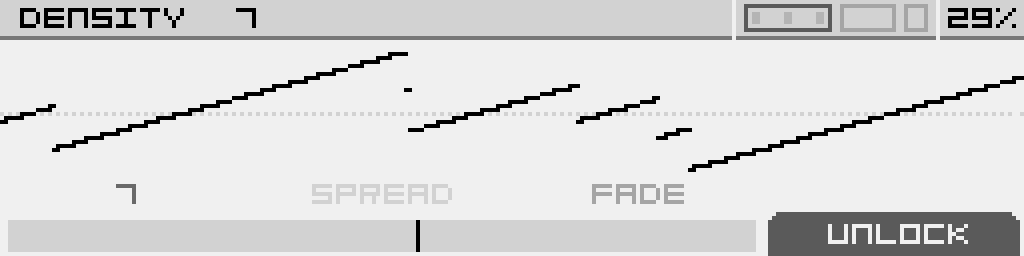
A swarm of detuned saw waves.
The oscillator tabs have 2 pages. Page 1 is the same as mentioned earlier.
Page 2:
| Density |
Spread |
Fade |
|
| Choose the number of saw waves in the swarm, up to 12 |
Adjust the amount of detuning between the waves |
Apply a volume fade on the most detuned saw waves to make the output less chaotic |
Square model
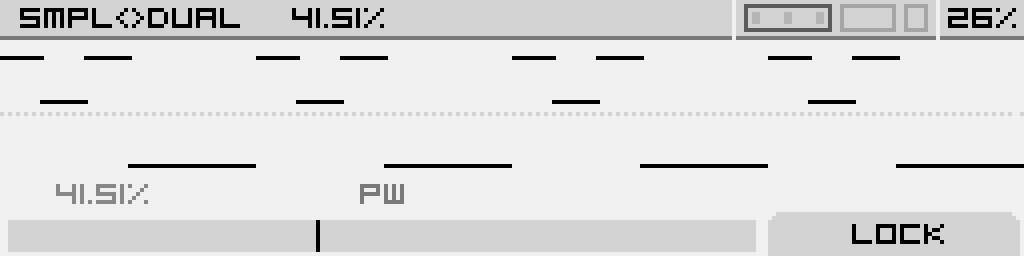
A Square wave with PWM capabilities.
The oscillator tabs have 2 pages. Page 1 is the same as mentioned earlier.
Page 2:
| Simple<>Dual |
PW |
- | - |
| Add harmonics by dividing the positive part of the pulse in three pulse segments |
Adjust the pulse-width of the output wave. Modulate for classic PWM sounds |
- | - |
Fold1 model
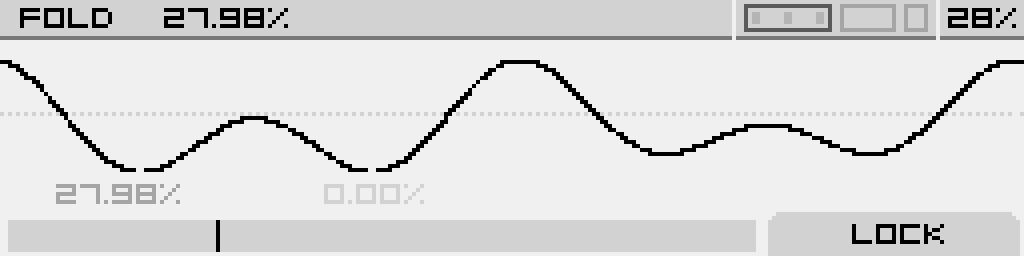
A sine wave is folded using the Chebyshev method
The oscillator tabs have 2 pages. Page 1 is the same as mentioned earlier.
Page 2:
| Fold |
Decimator |
||
| Increase the number of folds in the wave to add harmonics. |
Reduces the bit rate to add harmonics |
Fold2 model
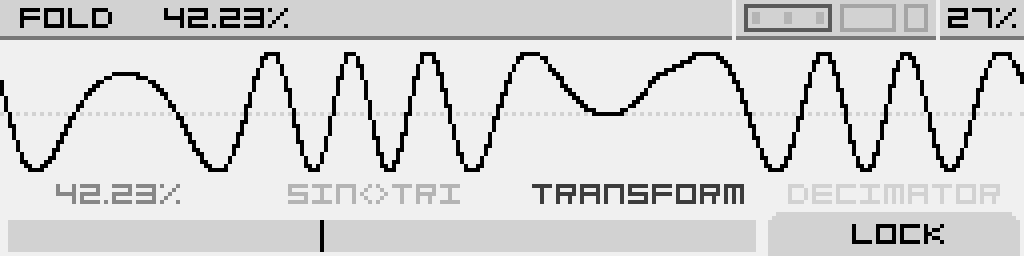
Two different out-of-phase waves are folded using the sinusoidal fold method
The oscillator tabs have 2 pages. Page 1 is the same as mentioned earlier.
Page 2:
| Fold |
Sine<>Triangle |
Transform |
Decimator |
| Increase the number of folds in the wave to add harmonics. | Crossfade between a sine and a triangle wave, which are out-of-phase with each other |
Adjust the phase of the sine and skew the triangle |
Reduces the bit rate to add harmonics |
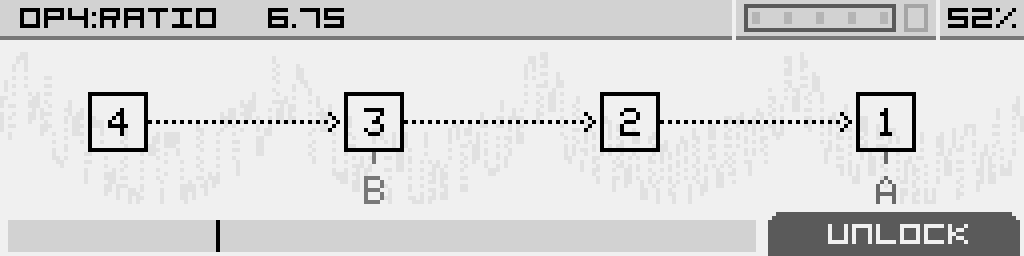
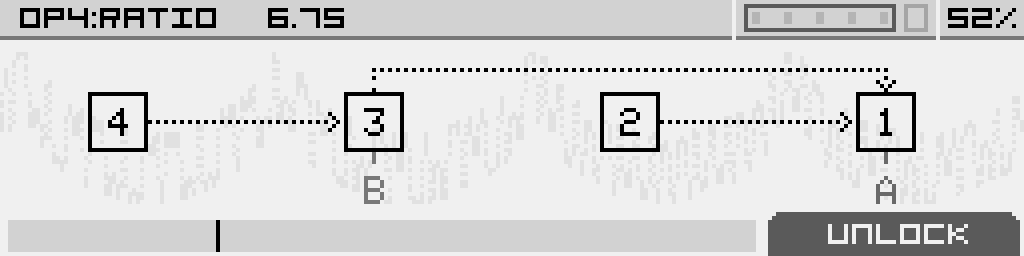
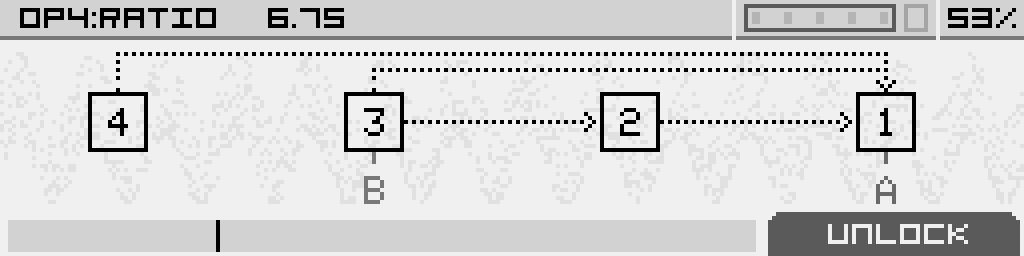
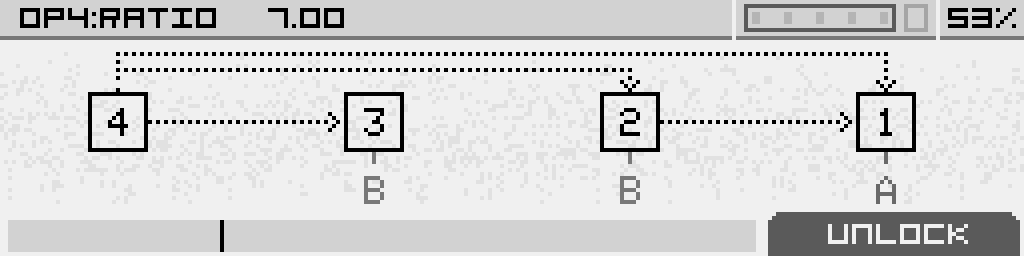
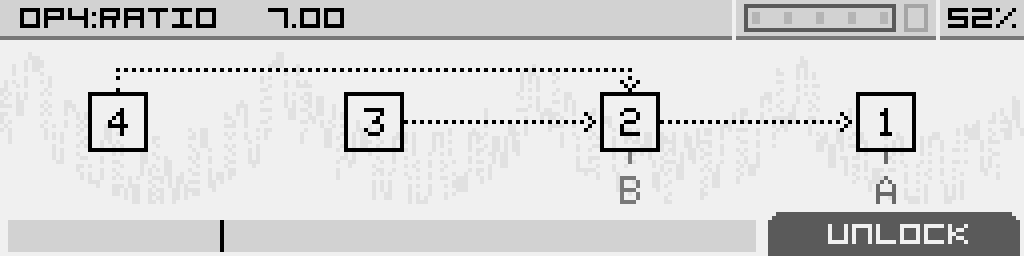
FM1 to FM8 model
4-Ops FM algorithms (TZFM, Linear & Exponential modes)
You will find a diagram of the different FM algorithms at the end of this section.
Each algorithm has its own configuration, but it shares some common features :
- There is always 2 outputs from different operators (A/B), you can mix these 2 outputs
- All operators are sine oscillators, but the operator 1 has a phase distortion to twist the sine, this allows you to add more harmonics / harshness to the sound
- Each algorithm has 4 different modulation mode : TZFM Linear 1, TZFM Linear 2, Linear, Exponential.
- You can adjust the ratio / depth of each operator
- There is no integrated enveloppes on operators, but you can modulate every parameters with internal or external enveloppes (or other modulations)
The oscillator tabs have 4 pages. Page 1 is the same as mentioned earlier.
Page 2:
| OP4: Ratio |
OP3: Ratio |
OP2: Ratio | OP1: Ratio |
| Adjust Operator 4 frequency, in multiples of the Carrier frequency |
Adjust Operator 3 frequency, in multiples of the Carrier frequency | Adjust Operator 2 frequency, in multiples of the Carrier frequency |
Adjust Operator 1 frequency, in multiples of the Carrier frequency |
Ratio parameters are stepped by 0.25 by default for more ease of use, but this can be free'd : Hold the button below the ratio parameter of the desired operator, then go to "SETTINGS" tab, then put "Stepped" parameter to off.
Page 3:
| OP4 : Depth | OP3 : Depth | OP2 : Depth | OP1 : Ph.Dis |
| Amount at which Operator 4 modulates the target operator(s) |
Amount at which Operator 3 modulates the target operator(s) |
Amount at which Operator 2 modulates the target operator(s) |
Amount of Phase distortion applied on the Sine. |
Page 4:
| Mix B<>A | OP3 : Mode | OP2 : Mode |
OP1 : Mode |
| Mix between the outputs from 2 different operators, by default, it's 50% / 50% |
It's how this operator is modulated, TZFM Linear 1, TZFM Linear 2, Linear or Exponential | It's how this operator is modulated, TZFM Linear 1, TZFM Linear 2, Linear or Exponential | It's how this operator is modulated, TZFM Linear 1, TZFM Linear 2, Linear or Exponential |
FM1 diagram
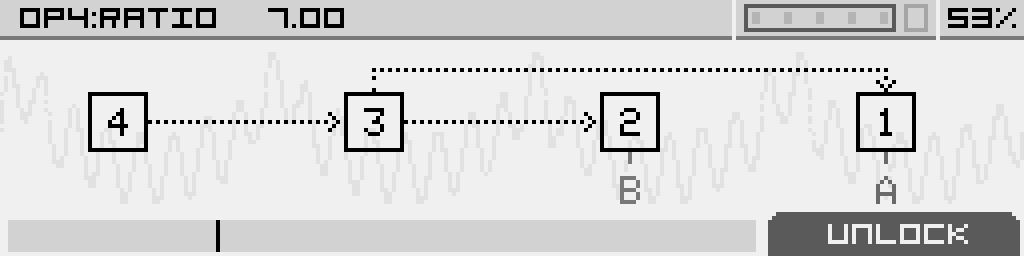
FM2 diagram
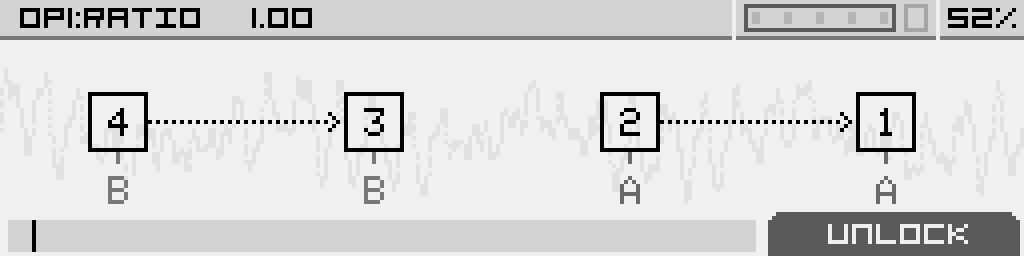
FM3 diagram
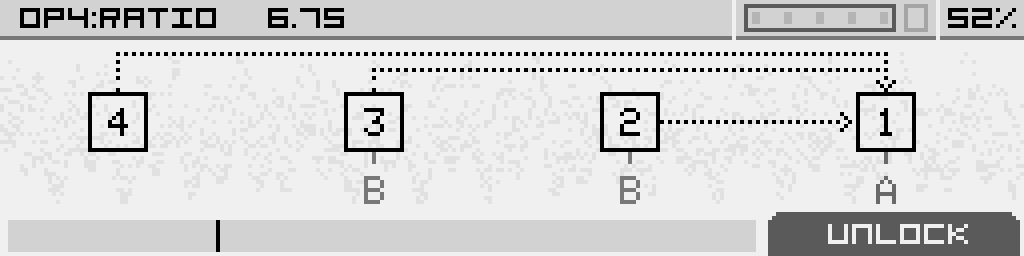
FM4 diagram
FM5 diagram
FM6 diagram
FM7 diagram
FM8 diagram
Ringmod model
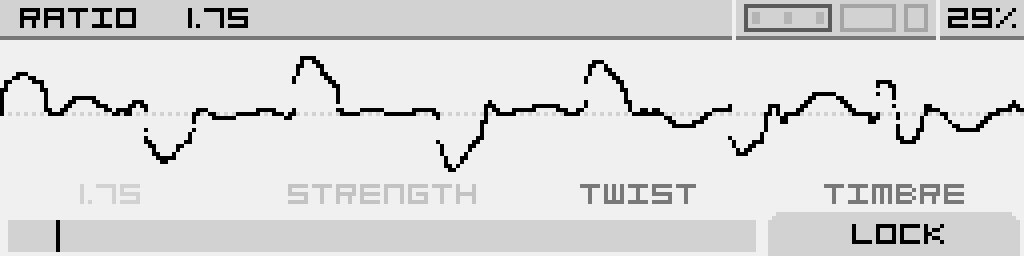
Two Ring Modulation algorithms where one oscillator's frequency is a multiple of the other one.
Algorithm A is a Saturated Ring Modulation and algorithm B is more like a Diode-Based Ring Modulation.
The oscillator tabs have 2 pages. Page 1 is the same as mentioned earlier.
Page 2:
| Ratio |
Strength |
Twist |
Timbre |
| Select the modulator frequency, being a multiple of the carrier frequency. |
Non-linear gain of both the carrier and modulator signals |
Distort the phase of the modulator oscillator |
Morph from algorithm A to algorithm B |
CZ model

A phase modulation and wave windowing algorithm inspired by the Casio CZ series.
The oscillator tabs have 2 pages. Page 1 is the same as mentioned earlier.
8 waveforms are availables, and can be combined (Saw, Square, Pulse, Double Sin, Saw Pulse, Reso1, Reso2, Reso3)
Page 2:
| Wave |
DCW |
Wave |
DCW |
| Select a target wave. If the second Wave parameter is not OFF, then this one will select a target wave for every odd cycle of the main sine. | Simulates a filter sweep by using a different phase modulation on each wave (combined with windowing on the Reso1, 2 and3 waves). At 0% only the main sine is heard, and at 100% only the target wave is heard. |
Select a target wave for every even cycle of the main sine. |
Simulates a filter sweep by using a different phase modulation on each wave (combined with windowing on the Reso1, 2 and3 waves). At 0% only the main sine is heard, and at 100% only the target wave is heard. |
Noise model
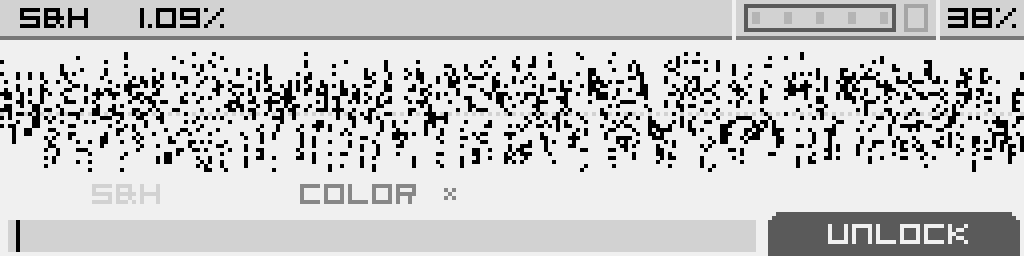
A filtered noise with sample & hold.
The oscillator tabs have 2 pages. Page 1 is the same as mentioned earlier.
Page 2:
| S&H | Color |
||
| The amout of time to hold the current sample. | To the left : cutoff from 0 to 100% Low pass filter. To the right : cutoff from 0 to 100% High pass filter |
Wavetable Synth
General information
This Machine features a wavetable oscillator with additional wave transformation capabilities, a sub oscillator and noise generator.

The oscillator, Sub and Noise go into a Filter section, then a Drive section and finally an Amp section before going to the Mixer. Go to the respective sections of the manual for more information on the Filter and Amp Sections.
Main screen of the wavetable synth
When opening the Wavetable Synth Machine you will land on page 1 of tab 1. Use the first 2 tabs to configure the wavetable oscillator and the sub oscillator + noise generator.
Use Tab 3 to configure the Filter section and Tab 4 to configure the Amp section.
The wavetable oscillator tab (Tab 1) has 3 pages containing different controls. When a Tab header displays small bar icons, click its corresponding button underneath to jump between its pages.
On any Tab in the Wavetable Synth Machine, the encoder is used to select wavetables in the current folder. Click the encoder, then "Load wavetable" to load other wavetable folders.
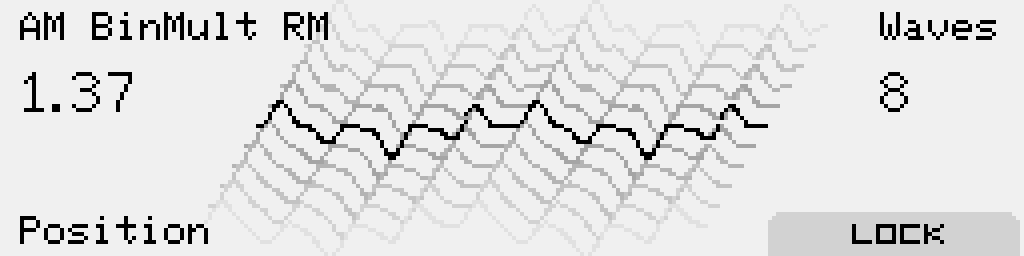
When turning the encoder (or the Position knob), a dedicated display will pop-up, showing the name of the wavetable, the position you're in, the number of waves in the wavetable and a wave display. This screen will stick for a couple of seconds, but you can lock it if you press button 4, labeled "Lock". Use knobs 2 and 3 to adjust the X and Y axis of the wave display to your liking.
You can see on this screen that there are 8 waves in total in the wavetable. The position parameter can therefore range from 1 to 8. Intermediate (non-integer) values are interpolated between the previous and next waves when the oscillator is in "MORPH" mode.
Wavetable Oscillator tab
There are 65 factory wavetables, licensed with Galbanum (https://www.galbanum.com/) derived from their "Architecture Waveform 2010" library. These wavetables are 16-bits, 2048 samples per wave (in the ANTIGONE_2048 folder or 256 samples per wave in ANTIGONE_256 folder)
Note that using 2048 samples wavetables are more CPU intensive than 256 sample wavetables. The sonic differences are negligible especially with the antialiasing enabled (Quality parameter)
680 free to use wavetables from WaveEdit Online https://waveeditonline.com/ (released under the CC0 1.0 Universal Public Domain Dedication) are pre-loaded on the SD Card.
You can also load custom wavetables using the SD card, you are only limited by the size of the SD Card. The oscillator will read 32/24/16 bits wavetables but play them in 16-bits. It will function with 2048, 1024, 512, 256 and 128 samples wavetables.
User wavetables have to be put in folders, anywhere on the SD card. You can't mix different sample formats within a folder, and the folder name has to end with "_XXX", with XXX being the sample format of the waves in the folder. For example "MyCustomWavetables_1024" if the wavetables are in the 1024 samples-per-wave format.
The excellent wavetable editor from Synthesis Technology can be used to edit all these 256 samples wavetables: https://synthtech.com/waveedit/
The wavetable oscillator tab has 3 pages.
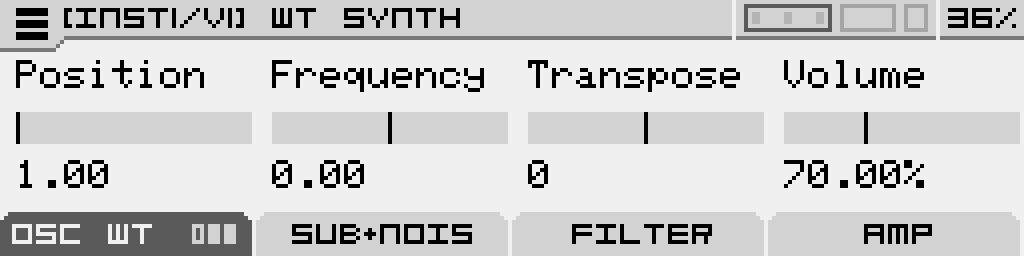
Page 1:
| Position | Frequency | Transpose |
Volume |
|
Navigate the wavetable. Modulate for classic wavetable morph sounds. |
Fine-tune the oscillator. This can also be used to detune the oscillator from the sub oscillator for chorusing or dissonance effects | Tune the oscillator in semitone increments | Set the amplitude at which the oscillator is sent into the Filter Section. 100% is unity gain, beyond that the output is amplified, useful for driving the Filter or Amp sections or even overdriving the final DAC. |
Page 2:
When you adjust a parameter on page 2, a wave display is briefly shown to reflect the changes on the output wave. Click Button 4 while the wave display is shown to lock it on. Click Button 4 again to unlock the display.
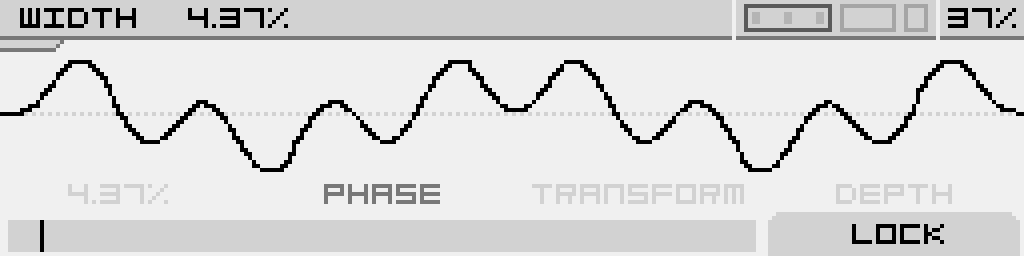
| Width | Phase | Transform |
Depth |
| Reduces the width of the waveform, without changing its pitch, by windowing it between blank spaces. It will affect the harmonics of the wave. | Change the starting point of the waveform. When using Width, it will scroll which segment of the wave is heard | Select one of the 6 wave-altering effects. See below for a reference of those. | Control the selected Transform effect |
Oscillator Transform effects reference:
| Off |
Sync |
Sync Window | Asymmetry +/- |
| The Transform effect is inactive | Simulates a sync effect. Depth will change the tuning of the master oscillator, the result is phase distortion. | Same as Sync but there is a "fade-in/fade-out" effect on the edges of the waveform in order to smooth out artifacts | Classic Phase Distortion. Depth is at 0% at noon, and turning it clockwise or counter-clockwise will distort the phase in either direction. |
| Sine | Decimator | Folder | Triangle |
| Phase distortion, but with a sine function instead of a linear function. | A bit-reducer effect. Turn Depth clockwise to reduce, down to 2bits, with an audio crossfading between the bit-rates. | A Chebyshev wavefolder |
Triangle wave phase distortion |
| Fractal | Bounce | Gravity |
Tidal |
|
Fractal-like recursive phase folding |
Multiple phase segments with alternating directions (1-8 bounces per cycle) |
Phase acceleration toward center attraction point using inverse distance relationship |
Slow multi-harmonic tidal waves with period variations |
|
Magnetic |
Crystal | Steps |
Quantum |
|
Dual magnetic poles with inverse square law force calculations |
Geometric faceted patterns (3-8 crystal faces) with lattice spacing |
Divides phase into discrete steps (2-16 levels) |
Discrete energy levels (4-16) with probabilistic quantum jumps |
|
Fade |
Collapse |
|
|
|
Applies fade windows of varying shapes based on transform depth |
Wave collapse simulation with multiple attraction points |
|
Page 3
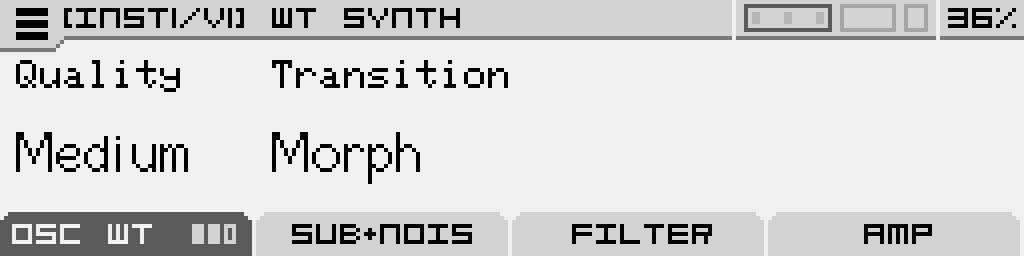
It contains general settings regarding the wavetable generation:
| Quality | Transition | - |
- |
|
The amount of oversampling while reading the wavetable. Draft means no oversampling, resulting in aliasing on complex waves but low CPU usage. Medium is x2 oversampling |
Select between classic wave interpolation or discrete change from one wave to another (no morph) | - | - |
Sub + Noise tab
A sub oscillator with extra features and a simple noise generator.
The Sub+Noise tab has 2 pages
Page 1:
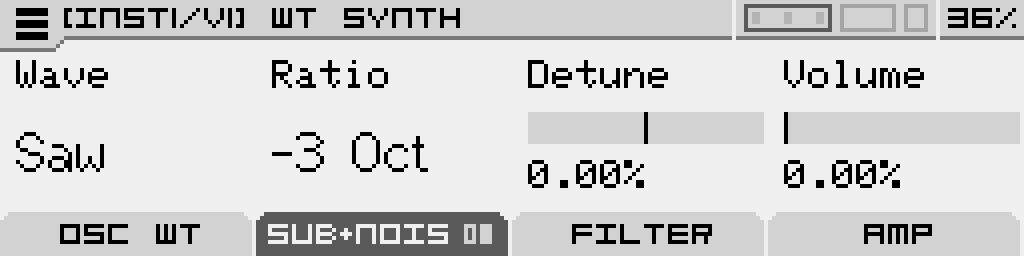
(outdated screenshot, will be replaced soon)
| Wave | Frequency | Transpose |
Volume |
| Select the sub oscillator's waveform between Saw, Square, Triangle, Sine and Wavetable. The Wavetable mode use the same wave as the main oscillator (without anti-aliasing, and without modfications) |
Fine-tune the sub oscillator. | Tune the sub oscillator in semitone increments | Set the amplitude at which the sub oscillator is sent into the Filter Section |
Page 2:
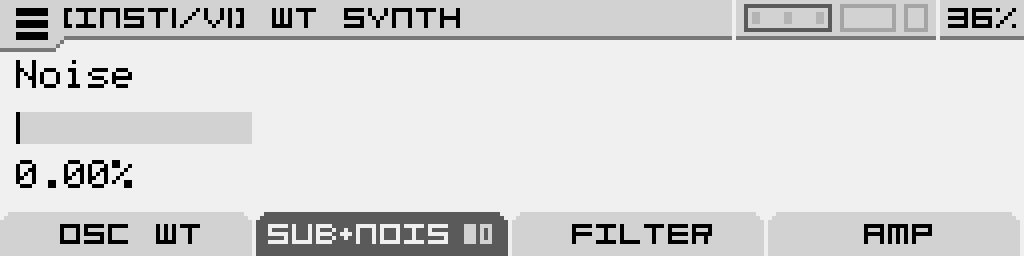
| Noise | - | - | - |
| Set the amplitude at which the noise generator is sent into the Filter Section |
- | - | - |
Sample Player
General Information
This machine is a basic sample player with looping capabilities and a couple of lo-fi effects.

The sample and noise generator is processed through the Lofi FX, followed by a Filter section, then a Drive section, and finally an Amp section before reaching the Mixer. Refer to the corresponding manual sections to learn more about the Filter and Amp sections.
It operates in mono at a 48kHz sample rate with a bit depth of 16 bits. It is compatible with PCM Wave files (converted on the fly if the bit depth or sample rate does not match; if a stereo file is loaded, only the left channel is used).
Main screen of the sample player
Upon opening the Sample Player Machine, you will land on Page 1 of Tab 1. Use the first two tabs to configure the sample player. Use Tab 3 to adjust the Filter section and Tab 4 for the Amp section.
Press the encoder to load a specific sample from the browser. In the browser, press Button 4 to enable auto-loading for a quick preview. Once a sample is loaded, turning the encoder scrolls through other samples in the current folder. A pop-up screen will appear, displaying the sample waveform in the same way as on Tab 2.
General Tab
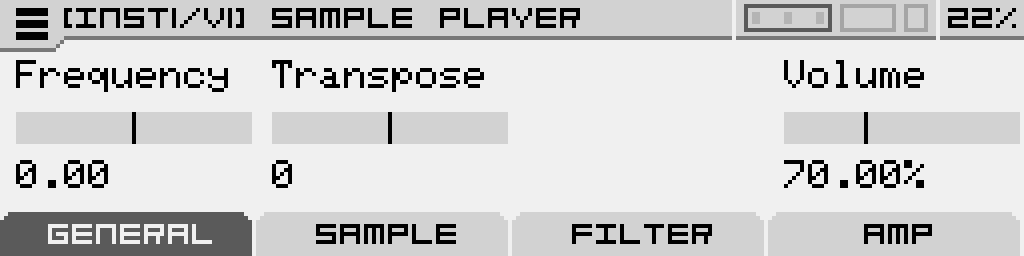
This tab contains basic utilities
| Frequency | Transpose | - |
Volume |
| Fine-tune the sample | Tune the sample in semitone increments |
- | Set the amplitude at which the sample enters the Filter Section. 100% is unity gain; beyond that, the output is amplified, useful for quiet samples or driving the Filter and Amp sections (or even overdriving the final DAC). |
Sample Tab
Use this tab to manipulate the sample file and its playback.
The Sample tab (Tab 2) consists of two pages with different controls. If a tab header displays small bar icons, press the corresponding button underneath to switch between its pages.
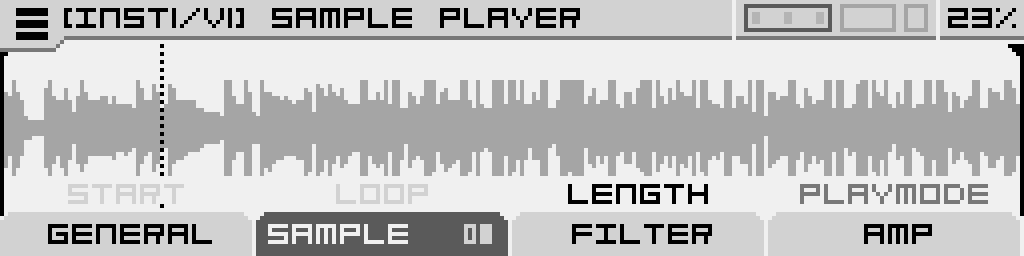
Page 1:
| Start | Loop | Length | Playmode |
| Set the starting point of the sample file | Set the loop point if one of the loop modes is activated | Set the sample's stopping point |
Select the sample playback mode:
|
Page 2:
| Decimator | Sample Rate Reducer | Noise | - |
| A bit-depth reduction effect. Turn Depth clockwise to reduce, down to 2 bits, with audio crossfading between bit rates. | An audio-rate sample-and-hold effect that introduces classic digital brightness and harmonics. Turn clockwise to lower the sample rate. | Mix white noise with the sample. The noise plays continuously, so adding an envelope to this parameter is recommended. | - |
Crossmod
General information
This Machine features a choice of different cross-modulation algorithms combining two of Antigone's voices to form a third one. The results can be hard to predict and this feature is more of a bonus to see what you can get out of the voices you have set up already.

The cross-modulated output go into a Filter section, then a Drive section and finally an Amp section before going to the Mixer.. Go to the respective sections of the manual for more informations on the Filter and Amp Sections.
Main screen of the crossmod
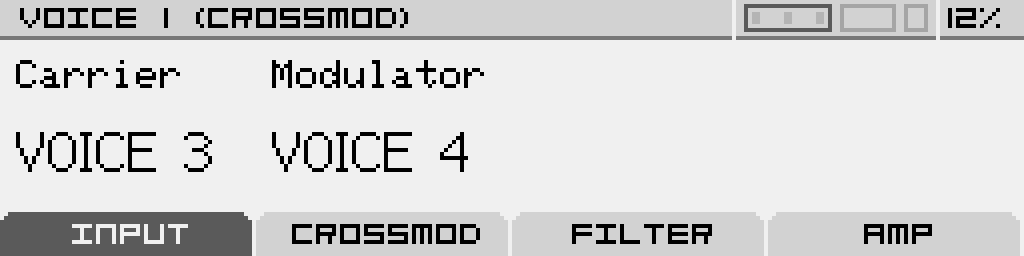
Input tab
Select the Carrier and Modulator voices using the first two knobs.
Crossmod tab
| Vol In 1 | Vol In 2 | Algo | Timbre |
| Controls the volume of the Carrier voice | Controls the volume of the Modulator voice | Select one of the 6 cross-modulation algorithms. Refer to the chart below for an overview of those. This parameter cannot be modulated. |
Depending on the choosen algorithm, it changes the timbre of the sound. (crossfade between dry and modulated sound for example) |
Cross-modulation algorithms reference :
| XOR | Modulo | Ring Modulation | Ring Modulation 2 | Sub | Negative - Positive |
| Performs cross-modulation between two audio signals using the bitwise XOR (exclusive OR) operation. | Performs cross-modulation between two audio signals using the modulo operation. | Performs a ring modulation between two audio signals. | Performs a diode based ring modulation between two audio signals. | Performs a gain then a substraction between two signals. | Keep the positive part of the first signal, and the negative part of the second signal. |
How to use it ?
As it is a particular machine that require 2 others instruments as source to works, it can be more tricky to use.
What I recommend is to create 3 mono instruments:
- The first two instruments with the machines of your choice—load only the machines without envelopes to use them as oscillators.
- The third instrument with the crossmod machine.
- Configure the Instrument Control of each instrument so they respond to the same CV/Gate input or the same MIDI channel.
- In the crossmod machine, select Voice 1 as the carrier and Voice 2 as the modulator (corresponding to your mono instruments 1 and 2).
- You can add envelopes to the filter and a DCA in the crossmod machine.