Modulations System
How modulations work ?
General Information
Antigone features a highly flexible modulation system:
- Almost all parameters of machines, modulators, mixer, scale quantizer, etc., are modulatable.
- All modulation sources are buffered and sample-accurate.
- They operate at the same frequency as the audio engine (48 kHz).
- Modulation sources can be internal or external to the module.
- Each parameter can have up to 3 simultaneous modulations + 1 absolute MIDI Control Change assignment (expander MIDI required).
- All active modulations have an independent smooth parameter that allows for value smoothing (slew limiter), preventing instabilities from an incoming modulation or unwanted "plops" from an envelope, for example.
- The modulation system operates in floating point for optimal sound quality and precision.
Modulation Flow Diagram

The diagram below illustrates how a modulation affects a given parameter. Three modulation sources are combined at different intensities using a virtual attenuverter. Then, they are limited (Clamp) to stay within the parameter limits. Finally, the resulting modulation is smoothed (Smooth).
MIDI CC is not considered a modulation source itself, as it has an absolute effect on the parameter value.
Modulation Representation
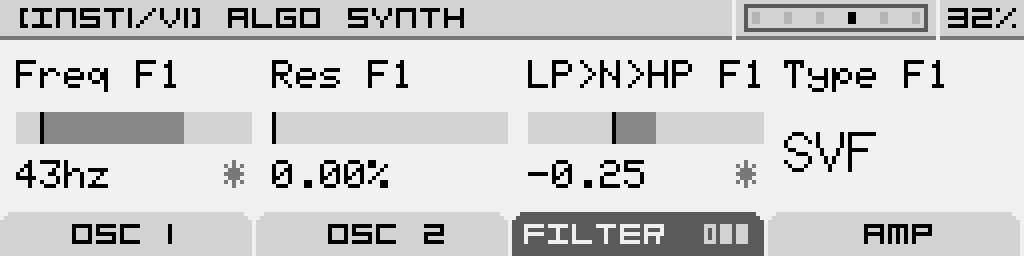
As previously mentioned in the documentation, each screen is divided into four sections corresponding to the four parameters controlled by the four infinite rotary encoders below them.
A (*) symbol under the parameter "Freq F1" indicates that one or more modulations are active on this parameter.
The horizontal gauge represents the parameter range: the left side shows the minimum value, while the right side shows the maximum value. The black marker within the gauge represents the unmodulated value of the parameter, which is set by the rotary encoder or via MIDI CC (expander required). The highlighted area extending from the black marker represents the modulated value, which is the actual value applied to the parameter.
When using a polyphonic instrument, the displayed modulation will always correspond to the first note played (if multiple notes are active at the same time).
How to Add a Modulation to a Parameter?
Adding a modulation to a parameter is very simple: just hold down Button 1 to 4 located under the parameter you want to modulate. This will open the screen that allows you to configure all modulations for the selected parameter.
Visit the page "MODULATION ASSIGNMENT" for more details.
How to Find the List of Active Modulations?
To view the list of active modulations, go to the "MOD MATRIX" screen.
Assign modulations
In the previous chapter, "How modulations work", we saw how to assign a new modulation to a parameter. As a reminder, simply press and hold button 1–4 located below the parameter you want to modulate. This opens the modulation assignment screen and parameter options.
Modulation Assignment Screen
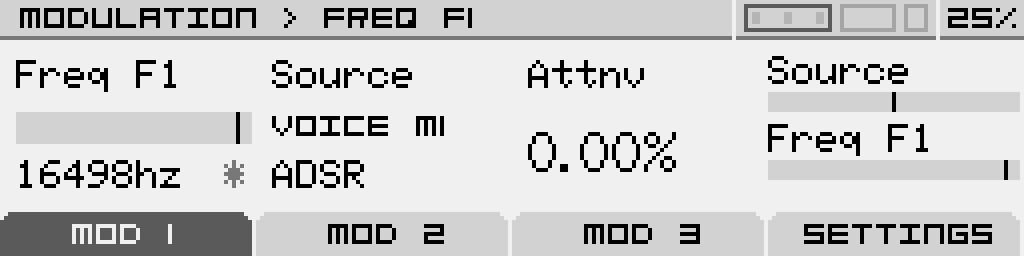
The modulation screen allows you to assign up to three internal or external modulations to a specific parameter on the module.
Screen Structure
The screen is divided into four tabs:
- The first three tabs MOD 1 to MOD 3: each one lets you assign a modulation to the selected parameter.
- "Settings" tab: gives access to advanced settings specific to the selected parameter.
Modulation Operation
A modulation is composed of a modulation source (Source) and an adjustable amount via a virtual attenuator (Attnv). The three modulations assigned to a parameter are summed together. Start by choosing a source from the list below:
Available Modulation Sources:
| SOURCE | Description |
| VOICE M1 to M4 <NAME> |
Modulator loaded in slots 1 to 4 of the instrument <NAME> is the name of the modulator (ADSR, LFOWT, ...) |
| VELOCITY (MIDI only) | Note velocity |
| KEYFOLLOW | Keyboard tracking based on the played note |
| MIDI AT (MIDI only) | MIDI Aftertouch control |
| MIDI MW (MIDI only) | MIDI Mod Wheel control |
| GLOBAL M1 to M4 <NAME> |
Modulator loaded in global modulator slots 1 to 4 <NAME> is the name of the modulator (ADSR, LFOWT, ...) |
| EXTERNAL CV A to L | Uses module inputs (A–F) or expander inputs (G–L) as modulation sources |
| INTERNAL NOISE | Uses internal white noise generator as modulation source |
| MACRO 1...16 | Project macros 1 to 16 |
| VOICE 1...6 OUTPUT |
Uses the voice audio output as modulation source |
| V1 to V6 M1...M4 <NAME> |
Modulator loaded in slots 1 to 4 of a specific voice (1 to 6) <NAME> is the modulator name (ADSR, LFOWT, ...) Allows cross-voice modulation |
Then adjust the modulation amount using the Attnv parameter, which ranges from -200% to +200%.
Advanced Parameters ("Settings" tab):
- Smooth: Smooths modulation to reduce clicks or noise caused by fast value changes.
- Stepped (available for certain parameters like ratios): Enables/disables value quantization, especially useful for FM operators.
- MIDI Assignment: Assign a MIDI Control Change (CC) to the parameter. Multiple parameters can be assigned to the same CC.
Shortcuts
Shortcuts to internal modulators and their slot management are available directly from this screen, to avoid deep navigation into menus.
Quick Access
While on a MOD 1 to MOD 3 tab, if the selected source is an internal modulator, click the encoder to instantly open the corresponding modulator. To return to the modulation screen, press the "Exit" button.
Selecting a New Modulator
If the selected modulation slot is empty (EMPTY), click the encoder to select and assign a modulator to that slot.
Replacing a Modulator
If you want to replace an internal modulator in an occupied slot, press and hold the encoder to swap it with another one.
Modulation matrix
The modulation matrix provides an overview of all modulations currently configured in the project.
Modulation Matrix Screen
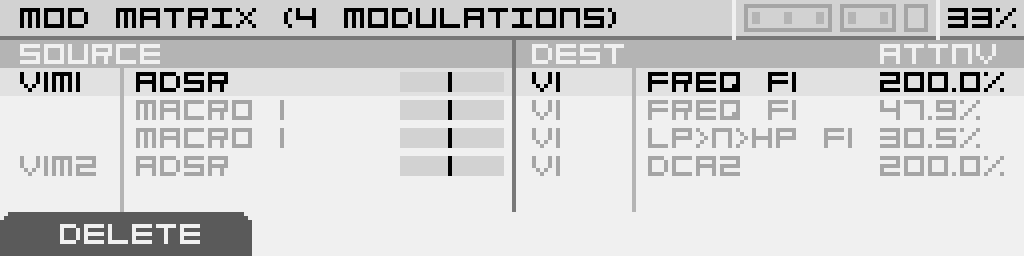
This screen is divided into two sections:
- On the left side of the table: the modulation source, along with its slot location, its name, and a real-time visual gauge displaying its activity.
- On the right side: the destination parameter, showing its slot and name, as well as the applied modulation amount (ATTNV). This amount can be adjusted directly using Potentiometer 4 located below this column.
At the top of the screen, you’ll find the total number of active modulations in the project. This count does not include modulations assigned to additional voices of an instrument. For instance, if you have a 6-voice polyphonic instrument with an ADSR modulating the filter, it will display as 1 MODULATION, not 6.
Navigation
- Use the encoder to scroll through the list of modulations.
- A short press on the encoder opens the modulation assignment screen for the selected parameter.
Modulation Management
Quick delete: The Delete button immediately removes a modulation, without confirmation.
Note that you cannot create new modulations from within the matrix.
Modulations can significantly impact CPU usage. Avoid keeping unnecessary modulations active—such as those with an attenuverter set to 0%, or modulations relying on a missing source (EMPTY).
Global modulation
Operation
Antigone provides 4 global modulation slots at the project level. These modulations can be used in the same way as instrument-level modulations, with the key difference that they cannot be triggered by notes played on the instruments.
The global modulation management interface is similar to that of instrument modulations. It presents four empty slots that the user can fill with different types of modulators, including:
- LFO Wavetable
- ADSR (Attack-Decay-Sustain-Release Envelope)
- S&H (Sample & Hold)
- Shape Sequencer
Global Modulation Management Screen

Advantages of Global Modulation
Global modulations are optimized for efficient CPU usage. Unlike modulations applied individually to each voice of an instrument, they consume fewer resources, making them an ideal solution for continuous modulators such as LFOs or shape sequencers.
To optimize performance and reduce CPU load, it is recommended to use global modulations whenever possible. This allows for rich and dynamic modulations without overloading the available resources for individual instruments.
Accessing Global Modulation
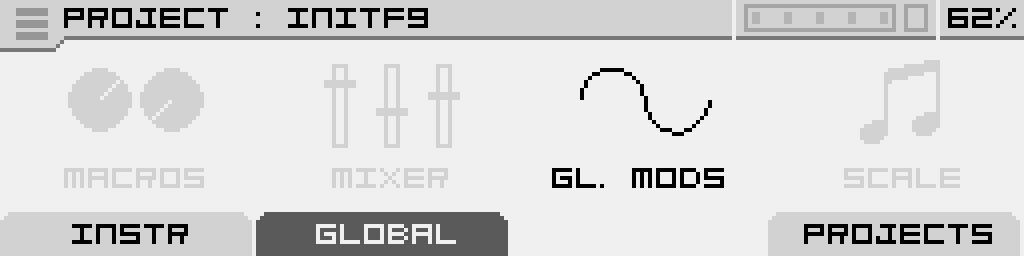
You can access global modulations from the main "PROJECT" screen by navigating to the "GLOBAL" tab. Select "GL. MODS," then click the encoder to enter the "GLOBAL MODULATORS" screen.
Slot Management
Adding a Modulator

To add a modulator, select an empty slot by turning the encoder left or right, then click the encoder or press the "ADD" button.
This will open a list of available modulators that you can assign to the selected slot.
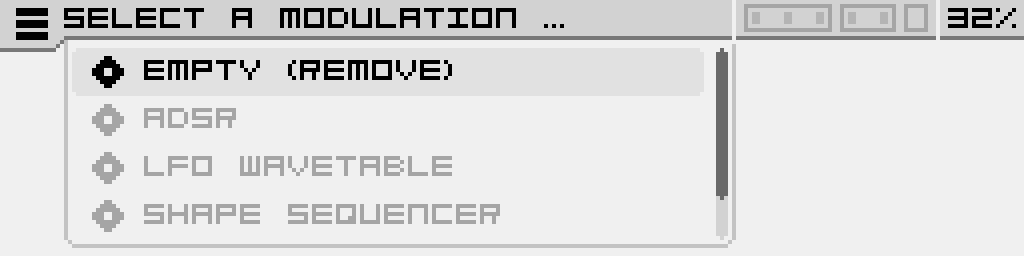
Confirm your selection by clicking the encoder.
Replacing a Modulator
If a slot already contains a modulator, you can replace it by selecting the "Replace" option. This allows you to quickly change the type of modulator assigned to the slot.

Navigating Between Slots
The encoder allows you to navigate between different slots. Clicking on an occupied slot provides direct access to the modulator’s parameters.